
Lab Testing 10 Macro Lens Options for Insect Photography
- Andrew Johnston
- Nov 3, 2025
- 12 min read

As entomologists and nature photographers, we're constantly striving to capture intricate details of our insect subjects. This post details some recent tests performed with Chris Wirth, trying out 10 different macro lenses, specifically evaluating their suitability for use in focus-stacking insect photography as well as handhelp field macrophotography. It's not just about sharpness, we also consider things like distortion, contrast, and overall lens utility – all crucial factors when creating publication-quality images. This post follows along with our field tests of a subset of these lenses.
Key considerations for choosing a macro lens
Many criteria could be discussed at length here, but for brevity we will focus on four main points:
Range of Magnification - the standard insect collection typically needs to go from around 0.5x - 5x life size (or 1:2 - 5:1). This may require a combination of lenses to meet all needs
Image quality - the lens must produce reasonably sharp photos that have limited distortion, good color, and appropriate contrast. Some corrections can always take place later, but you can never recover details that are not included in the original image.
Lens price and availability - budget is important and lenses are not the only thing we have to buy to focus-stack images. Furthermore, some lenses might be reasonably priced on the used market but have low availability or be more difficult to obtain.
Ease of use - this is hard to quantify, but many of us are building camera systems used by multiple people and/or with multiple use cases and a lens that works well and lends itself towards a reproducible workflow is critical.
Quick caveat: No lens will be perfect and will be a compromise of the criteria examined here. Furthermore, much of this is subjective. We did our best to be consistent at the very least, and tried to be as 'objective' as possible. If it's any indication of not giving in to pre-conceived opinions, I ended up changing my lens preferences from this test!
Testing methods
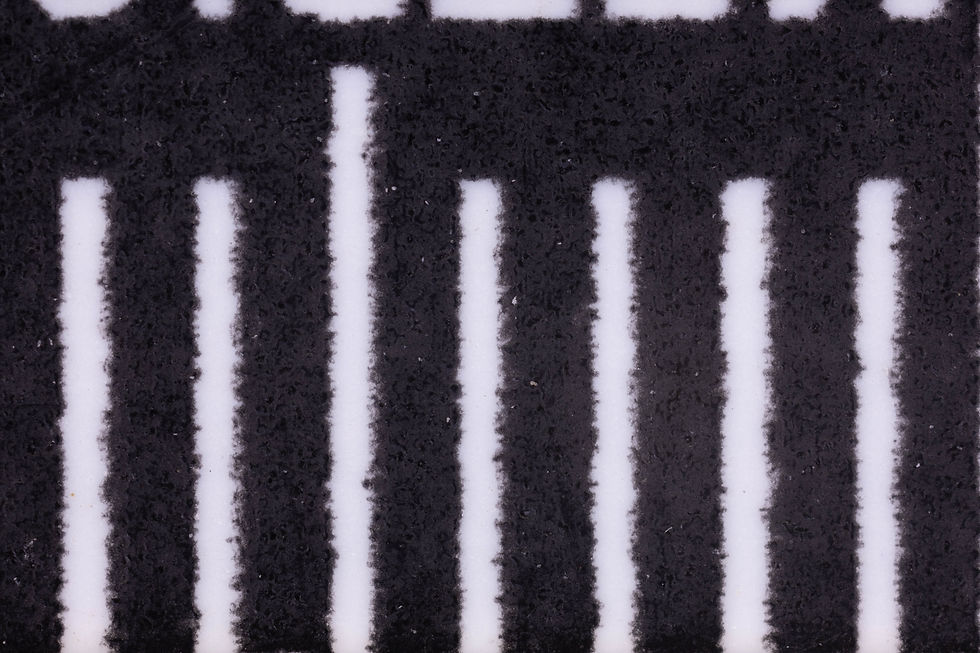
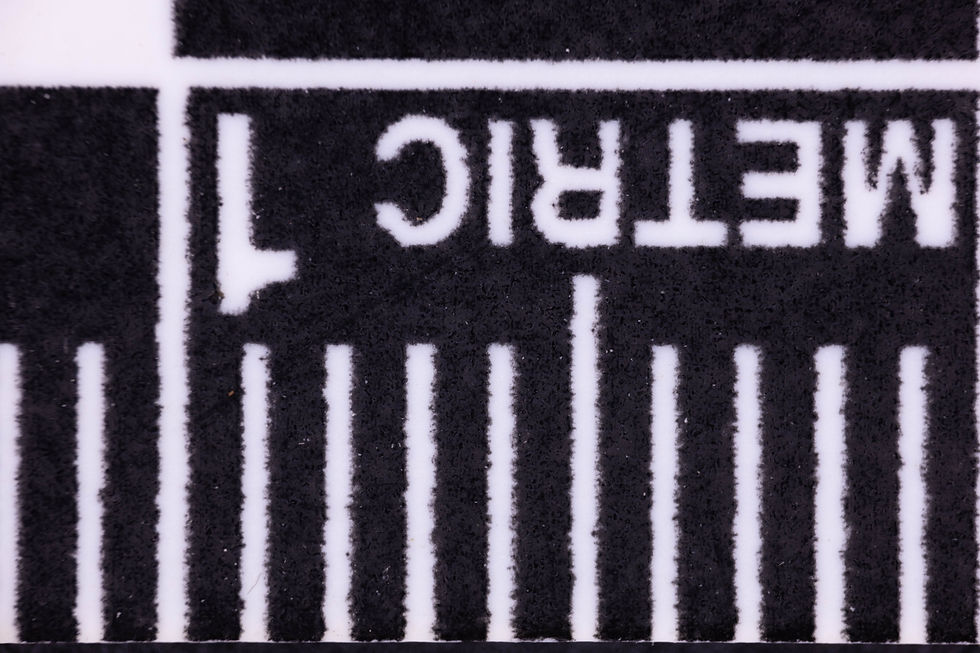
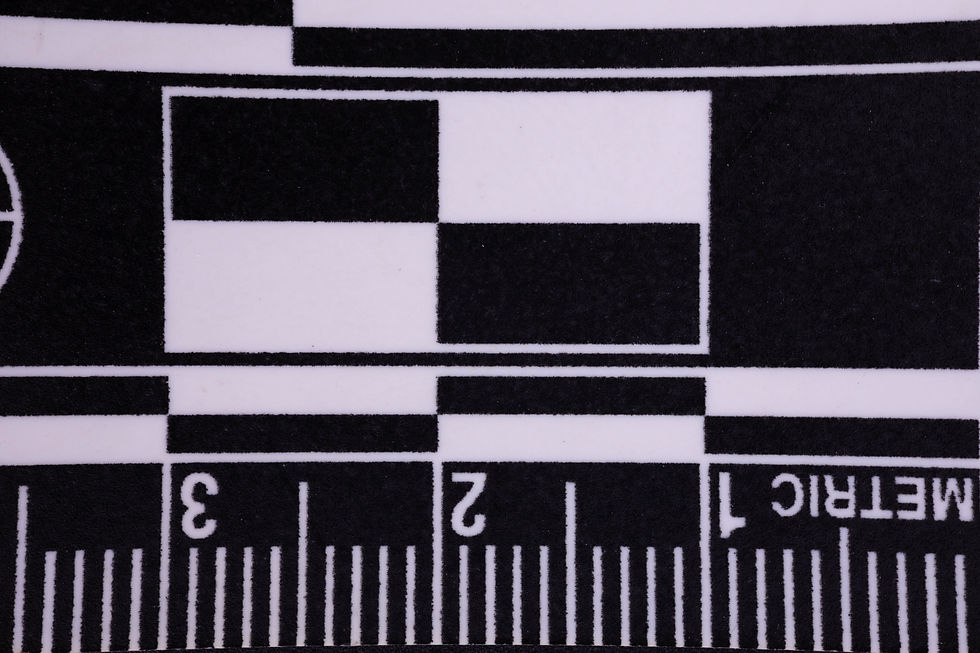
We used Chris's focus-stacking system which is effectively the same as one outlined in a previous blog post. We used a Canon RP body (full frame sensor) and 4 Godox LED64 light panels to create consistent lighting. The aperture for each lens was set to f5.6 and set to aperture priority (a shutter speed of 1/60 through 1/200 of a second was used to get proper exposure on our subject). Our subject was a somewhat boring black plastic ruler with white printed markings for 1mm intervals. Two to four images were taken at each labeled magnification for the lens an we selected the 'best' image of the series (i.e. the one that was sharpest/most in focus) to compare. We measured the 'working distance' which we defined as the distance from the apex of the lens to our subject (real working distance would be back to the sensor, but we really want to know how much space we have to put a pinned insect underneath the lens without hitting it).

The Lenses
Ten lenses were tested, as listed in the following table.
Macro Lens | Magnification Range | Price (as of Nov. 2025) | Notes |
1x - 5x | $700-$800 (used) | 'Industry standard' but discontinued and requires adapter for mirorless cameras | |
1x - 5x | $400 | Only available from manufacturer? | |
2.5x - 5x | $400 | ||
2x - 5x | $250 | ||
up to 2x | $500 | ||
up to 2x | $180 | ||
up to 2x | $450 | f5.6 max aperture, compact lens | |
up to 1x | $600 (used) | requires lens adapter; RF 100mm lens is $1250,max 1.4x | |
up to 1.8x | $15 for reversing ring, assuming you have a non-macro lens | Standard kit lens with a reversing adapter | |
Nikon PB6 bellows with EL-50mm enlarging lens | 1x-4x | $200 or so, multiple used parts | This is an extendable bellows with an enlarging lens clasically used during film enlargement |
(bonus) Raynox DCR-250 | ~1.6x boost | $70 | This is a diopter which boosts the macro magnification of your lens. |

Recommendations and Summary of Conclusions
To see the full results and sample images, see below. This section summarizes our final thoughts and recommendations after handling all the lenses and staring at the photos for a very long time.
Canon MPE65mm - the 'industry standard' for a reason
This lens is fantastic. Great image quality throughout its range and reasonably priced on the used market (while supplies last). If you have a copy of this lens, you should probably keep using it. There are a few issues, though, which prevents this lens from being a hands-down winner. (1) Discontinued - this lens requires adapters for modern cameras and is going to become harder and harder to find (at least in like-new condition). (2) Max 1x magnification - this lens can be too high-powered for larger insects. A full frame camera will reliably let you photograph an insects around 23mm long/wide which is not enough for many spread butterflies and moths, or larger beetles, grasshoppers etc. (3) Long extension for magnification - this isn't necessarily a problem, but the telescoping lens might need to be accommodated in your imaging system design. You can see this in the image above of all telescoping lenses fully extended. The lens is also somewhat heavy and requires an adapter to use on modern (mirrorless) cameras.
Ultra Macro - Laowa 25mm & AstrHori 25mm
For anyone looking to take photos higher than 2x magnification, these lenses are the answer. I have used the Laowa 25mm for multiple years and formerly included it in my recommended focus-stacking build. It goes from 2.5-5x and works very well. The AstrHori lens shocked us both. The copy we tested as as sharp as any other lens (the MPE65mm included) down to 5x - it is also the least expensive lens going over 2x. Both of these lenses are strong contenders with marginal differences. The Laowa 25mm can be purchased fgor DSLR cameras but starts at 2.5x. The AstrHori is only available for modern mirrorless mounts but starts at 2x. I would recommend going with the AstrHori if you use a mirrorless camera, but the Laowa 25mm is fantastic if you are using a DSLR and if you already have this lens there is no need to upgrade from it.
Up to 2x - Laowa 85mm & 100mm
Laowa has dominated the third-party longer focal range (85-100mm) macro lenses for some time. These lenses are tack sharp and very affordable. Like all the lenses mentioned above that have higher magnification, these are also fully manual lenses. The choice in this range is largely going to depend on what you plan to use these for beyond focus-stacking. The 100mm is fantastic with a max aperture of f2.8 and can be great for portraits - but the lens is larger and heavier. In contrast, the 85mm is slower with a max aperture of f5.6 but this comes with the benefit of a smaller and lighter lens body. I greatly prefer the 85mm for handheld field work and I never shoot below f5.6, so I see no downsides with it. If you know it will never leave your indoor focus-stacking rig, or sometimes take portrait or landscape shots then you might consider the 100mm.
The Canon EF 100mm is worth mentioning here as well. It is the only auto-focusing macro lens we tested which could be nice for certain uses, but is typically not used by field or lab-based macro photographers. It also maxes out at 1x, so it is probably not the best choice for a focus-stacking rig. That said, it is super sharp and a fantastic lens. It works great for insects, and I have found the newer Canon RF 100mm L f2.8 lens to be my go-to in the field where I pair its 1.4x magnification with a crop-sensor camera and optionally the Raynox DCR-250.
Ultra-budget DIYers - Bellows and Enlarging lenses
I must admit, I might have uncharitably rolled my eyes when Chris pulled this out to test. But after looking at the photographs, I owe him an apology. This uses some of the best optics available - enlarging lenses were sold for a premium back in their day when they were used to scale up a film image to a large print, though they are quite affordable now if you can find one for sale. The bellows is not particularly cumbersome in use, the only major downside is that there are no markings for magnification, so every shot is going to be a little different and you will probably have to shoot a ruler for later reference to add scale bars to shots. This option can be quite affordable to give you roughly 1x-4x magnification, but requires some extra know-how to assemble and does not lend itself to easily reproducible workflows.
DANGER ZONE! Mitakon 55mm, Brightin Star 60mm, reversed lenses
Just stay away from these. Seriously.
We had such high hopes for the Mitakon lens, which was actually super easy to use in the field, felt great in the hand and had a good working distance. Unfortunately the contrast and sharpness of images is terrible. It also telescopes (extends) on its own, so you could not keep this lens pointing downward at all or it would change its focus all on its own, thereby rendering focus-stacking impossible.
The Brightin Star had major lens aberrations and did not produce sharp photos. This was basically the opposite of the AstrHori - this tried to offer a lower-priced alternative to (the already very affordable) Laowa lenses, but the BrightinStar is best used as a paperweight.
We didn't expect too much from the lens reversing adapter, but had hoped that a cheap part might give a good option for folks to get into macro photography. This may perform better with other lenses, and other tutorials and write-ups can be found around the web. However, the Canon RF 24-105 lens is reasonably sharp when used normally, but the distortion in the reversed images make this a non-viable pathway for serious photographic work.
Test Results
Our detailed results are summarized in the table below. We recorded the printed magnification on the lens for each shot, the actual frame width (to test whether the magnification was true - the camera sensor is 36mm across), and the working distance (here defined from the end of the lens to the subject).
Canon MPE 65mm 1-5x
Used with the EF to RF adapter.
Magnification | Frame width (mm) | Working distance (mm) | Notes |
1x | 36 | 100 | |
2x | 18 | 62 | |
3x | 12 | 49 | |
4x | 9 | 44 | |
5x | 7.25 | 40 |
This lens was fairly sharp throughout its range and the markings were true to their magnification values.


Mitakon 55mm 1-5x
The lens extending on its own and needed to be fixed in place with several pieces of tape to focus and take these images. It was not suitable for a focus-stacking system.
Magnification | Frame width (mm) | Working distance (mm) | Notes |
1x | 34 | 144 | |
2x | 18 | 94 | |
3x | 12 | 76 | |
4x | 9 | 67 | |
5x | 7.25 | 60 |
The extra working distance for this lens is quite nice, and it telescopes less than the Canon MPE 65mm. Image sharpness was OK, but the lack of contrast made the images very poor quality and there seems to be some internal reflections at play. If the manufacturer can fix the self-extending nature of the zoom and increase the optical quality a bit, the overall handling and external design of this lens would make it fantastic. However, in its current state it is not useful to the insect photographer.


Laowa 25mm 2.5-5x
This lens starts at 2.5x, which makes it necessary to pair with a second lens to image larger specimens.
Magnification | Frame width (mm) | Working distance (mm) | Notes |
2.5x | 18 | 43 | |
3x | 12 | 42 | |
4x | 9 | 40 | |
5x | 7.5 | 37 |
This lens has a similar working distance to the Canon MPE 65mm but has a smaller barrel size which allows for a bit easier specimen manipulation. It is reasonably sharp throughout its range.

AstrHori 25mm 2-5x
This lens is clearly modeled off of the Laowa 25mm, but its design for mirrorless cameras allows it to extend from 2x - 5x (instead of starting at 2.5x) while taking up the same overall size as the Laowa lens.
Magnification | Frame width (mm) | Working distance (mm) | Notes |
2x | 18 | 43 | |
3x | 12 | 39 | |
4x | 9 | 37 | |
5x | 7.5 | 37 |
The working distance and overall feel is very similar to the Laowa 25mm. From the copies we tested, the AstrHori seems just a tad sharper than both the Laowa and Canon MPE 65mm in the higher magnification ranges - definitely a great purchase!


Laowa 100mm up to 2x
We started testing at 1x, but the lens can zoom out to infinity making it great for shooting larger insect subjects.
Magnification | Frame width (mm) | Working distance (mm) | Notes |
1x | 36 | 94 | |
2x | 18 | 75 | |
3x* | 12 | 51 | With Raynox DCR-250 attached |
This lens creates super sharp images and has a long working distance which could be a benefit or slight negative, depending on your setup. This lens could be paired with one of the ultra-macro lenses tested above, or the $70 Raynox might be enough if you do not need to image specimens smaller than 7-10mm in length.

Laowa 85mm up to 2x
This lens is very similar to the 100mm tested above, but in a much more compact package starting at f5.6.
Magnification | Frame width (mm) | Working distance (mm) | Notes |
1x | 36 | 96 | |
2x | 18 | 75 |
This lens is fantastic (and sharp), and is especially great for using both in the field and lab. The small body is light and easy to handle. The working distance is fantastic due to its compact form. This can also be paired with the Raynox diopter but requires a (cheap) step-down ring to attach.


Brightin Star 60mm up to 2x
Started at 1x.
Magnification | Frame width (mm) | Working distance (mm) | Notes |
1x | 36 | 70 | |
2x | 18 | 51 |
We hoped this affordable lens would be similar to the Laowa line. Unfortunately, the images were incredibly distorted and curved across the frame and it had poor sharpness and low contrast. Ultimately, it is not worth even using as an entry-level lens - simply save up and get a Laowa lens.

Canon RF 24-105 reversed
This lens was reversed with a 67mm reversing adapter. This makes the lens not connect electronically so it was 'wide open' at f5.6. The lens could be expanded between 24 and 105mm to focus and change magnification.
Magnification | Frame width (mm) | Working distance (mm) | Notes |
1x | 36 | 45 | ~45mm focal length |
1.8x | 2420 | 17 | 24mm focal length |
The working distance is short and the images are not particularly sharp. Because this is not a manually controlled lens, there is no aperture control while reversed and you will be left at whatever the widest aperture is natively. This is a fun option for $15 but is not particularly practical. It could work better for folks who have super old high-quality film lenses that an inexpensive adapter could turn into a macro option - but is not really workable for the situations being tested here.


Bellows + Enlarger lens
Note that the magnifications were calculated afterwards - we attempted to get as close to even magnification multipliers as the other lenses provided. One table is for the enlarging lens used in its normal position, the second is with the lens reversed which provides slightly more magnification. This is because it was used to project an image on a larger piece of photosensitive paper, but in this instance we really want to project towards the sensor, hence the reversal.
Enlarger lens "normal"
Magnification | Frame width (mm) | Working distance (mm) | Notes |
~1x | 36 | 70 | bellows fully closed |
~2x | 18 | 46 | |
~3x | 12 | 37 | |
-- | 9 | 33 | fully extended |


Enlarger lens reversed
Magnification | Frame width (mm) | Working distance (mm) | Notes |
-- | 23 | 63 | bellows fully closed |
~2x | 18 | 51 | |
~3x | 12 | 47 | |
~4x | 9 | 44 | |
-- | 8 | 42 | fully extended |


When reversed, the enlarger lens provides higher magnification and a longer working distance. overall, this will take great images, but you will have to purchase some adapters and mounting components for the bellows - these are readily available and inexpensive, but you will need to do your homework to finalize a fully working system.
Canon EF 100mm IS L
This lens was used with an EF-RF adapter and tested with several magnification options.
Magnification | Frame width (mm) | Working distance (mm) | Notes |
1x | 34 | 96130 | slightly closer than 1:1 at full lens extend |
~2x | 17 | 55 | with Raynox DCR-250 |
-- | 29 | 119 | with 13mm extension tube |
-- | 27 | 115 | 21mm extension tube |
-- | 24 | 110 | 31mm extension tube |
~2x | 18.5 | 96 | 65mm extension tube |
We won't say too much about extension tubes and there are great resources elsewhere on the internet. The major downside is having to disconnect the lens and camera body to insert the tubes - especially if you are taking photos in the field. Because of the 100mm focal length, we need quite a bit of extension to get double the magnification.
Image quality is fairly good with the Raynox and the extension tubes but it begins to get softer in the corners here there is some optical "smearing" when zoomed in to the far corners of the frame. In general, using a diopter or extension tube, we would recommend to utilize the center of the frame as much as possible to avoid image degradation.


Comments